I have no idea about lighting and would like to learn.

My arms are out holding cardboard. I got my sister to press the camera button

I pressed the button myself

My friend came over to play
Hot lights are hot and make me sweat.
A discussion forum - and more - for users of Digital Single Lens Reflex cameras.
Playing with hot lightsModerators: Greg B, Nnnnsic, Geoff, Glen, gstark, Moderators
Forum rules
Please note that image critiquing is a matter of give and take: if you post images for critique, and you then expect to receive criticism, then it is also reasonable, fair and appropriate that, in return, you post your critique of the images of other members here as a matter of courtesy. So please do offer your critique of the images of others; your opinion is important, and will help everyone here enjoy their visit to far greater extent. Also please note that, unless you state something to the contrary, other members might attempt to repost your image with their own post processing applied. We see this as an acceptable form of critique, but should you prefer that others not modify your work, this is perfectly ok, and you should state this, either within your post, or within your signature. Images posted here should conform with the general forum guidelines. Image sizes should not exceed 950 pixels along the largest side (height or width) and typically no more than four images per post or thread. Please also ensure that you have a meaningful location included in your profile. Please refer to the FAQ for details of what "meaningful" is.
Previous topic • Next topic
18 posts
• Page 1 of 1
Playing with hot lights
Pulled out some hot lights from the cupboard to play with.
I have no idea about lighting and would like to learn.
My arms are out holding cardboard. I got my sister to press the camera button
I pressed the button myself
My friend came over to play Hot lights are hot and make me sweat. ---
Equipment: camera body, wide lens, standard lens, telephoto lens, flash Wish list: skill
That looks like a real Canon camera in image #3.
Let's take up the discussion with a couple of questions though: What do you consider were your goals from this exercise? Do you feel you achieved them, and why/why not? g.
Gary Stark Nikon, Canon, Bronica .... stuff The people who want English to be the official language of the United States are uncomfortable with their leaders being fluent in it - US Pres. Bartlet
Hi Gary
That's my friend's AV-1, feels so solid! My goal for this exercise was to see whether I not I could do it. It might sound silly, but then, I've never done this type of thing before, and read about it online and wanted to give it a go. I wanted to try it out, to have a 'practical' experience. To me, it was a good exercise (though the pictures may not have worked), but I feel that I learnt (through experimenting), placing of lights in relation to the person we are photographing. It was fun to see the different images which could be achieved by varying the lighting ratios, but turning off the lights, pulling them further away or facing the person another way. I'm always still in the learning process and would to learn more. Eventually, I would like to be able to take outdoors photographs of people with off-camera lighting (I used the hot lights not only because I already had them, but also because it allowed me to "see the light", so it may be easier to visualise in the future). Currently my outdoors photographs are just shoe-mounted-on-camera fill flash, but would like to learn about taking it off-shoe, lighting it from a different angle to create different effects, make it look nicer - to try to be different from what I've been doing. I still need to learn and practice They were pictures of myself as I didn't have anyone else (willing) to take photos of until my friend came over. ---
Equipment: camera body, wide lens, standard lens, telephoto lens, flash Wish list: skill
The AV was a nice camera. Almost as nice ans the AE1.
Of course, the A1 was the camera body to have in that product line, but they were very nice cameras. I had two A1 bodies, and a freind of mine in LA still has his A1, although it only gets pulled out for reminiscences these days. I should offer to relieve him of it sometime: Leigh hasn't (to my knowledge) used one, and I think he would be very impressed with it too. But I digress. How unusual. Ok, I think that, from what I'm seeing, you have made a very good start here. Can you describe the lights that you used? As a thought for you, do you have a table where you can set the lights up aroung the table, and then try shooting static objects placed on the table's surface? Consider using a plate of fruit, and then a bowl of fruit. Coffee cups: full or otherwise. Household objects of various kinds - just some stuff that's lying around, and then stuff like a watch, a wine bottle, a wine glass ... use your imagination. Shoot thses sorts of objects, doing exactly what you did in the original exercise to vary the relative positions of the lights, and note the differencs that are being created in the placement and intensities of the shadow areas. Move the lights around: one light only: to one side, directly above, directly in front, from behind .... add the second light ... or maybe a piece of white cardboard. Post some of your results, and importantly, post your thoughts as to what you think is happening. g.
Gary Stark Nikon, Canon, Bronica .... stuff The people who want English to be the official language of the United States are uncomfortable with their leaders being fluent in it - US Pres. Bartlet
I like the feel of the focussing on the FD lens (he had a 50mm f/1.4 on there), it's really smooth - and full frame! haha.. after playing DSLR for a while, the 50mm looks so big on the film cameras.
The lights that I used were the big yellow ones from bunnings, I searched online to find an image of them, they look like these: http://www.wiringproducts.com/media/100 ... _light.jpg http://www.wolo-mfg.com/5500.jpg With the halogen bulbs (very hot and yellow-light, so I needed to do a custom white balance). Thank you for the suggestion of shooting static objects on a table, and then varying the light/s. I will definitely do this exercise today and post the results here ---
Equipment: camera body, wide lens, standard lens, telephoto lens, flash Wish list: skill
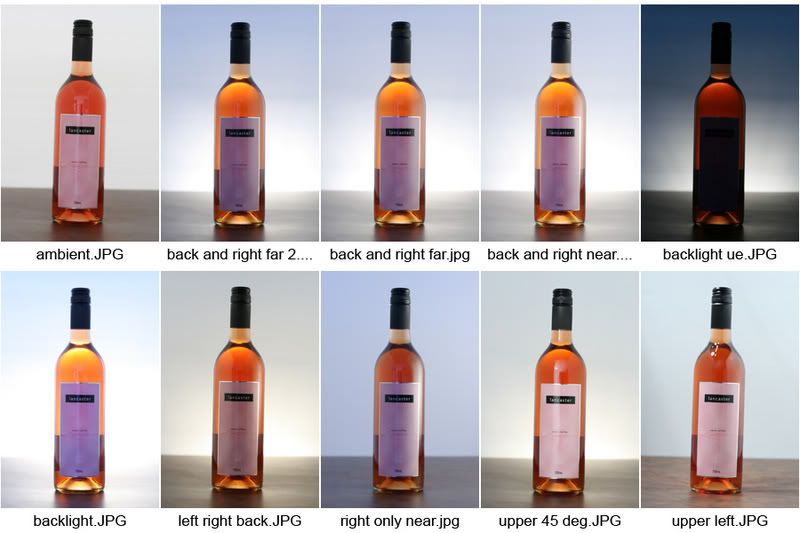
I put a bottle of wine on the table, but was getting reflections from all around the room, so set up a few pieces of card to stop it, (but was unable to put a piece of card at the top as evident in the bottle reflections) I took a few shots of it in ambient light, before realising to set up the cards around, the resulting image, a very plain sort of shot. I put a light behind the card behind the bottle and it made the insides of the wine glow - I think what you see from the front of the wine bottle is an image of what is behind the bottle - like a lens. I placed the light on a chair, lighting the bottom of the cardboard more than the top, resulting in the glow from the lower portion of the background. I did a custom white balance by putting a piece of white paper where the wine was. The card at the back was white, but I think because the light intensity falls off the further it gets from the source, the upper portion of the card is lit by the ambient light while the lower is lit by the lamps. So there's a slight gradient from white to blue - which for me, was unintentional, but a nice effect. I placed one light behind, one on the right and one on the left, and turned them on one by one to see their effect, then tried different on/off combinations (reminds me of superposition I did not have a particular image in mind, but observing the effect of each light, I iterated from the initial conditions superpositioning the effect of each light into areas that did not seem to have enough light. Something I read about was about the relation between the size of the light and it's distance from the subject. But in this exercise I got to see it in practice. Because the translucent cardboard was a constant distance from the bottle, I'm not sure whether pulling the lights further away from the cardboard is the same as changing the distance of the light. The size of the light source remains constant, but the amount of light from the card to the bottle changes (intensity drops by the inverse square of the distance). Should the size of the light be considered to be the amount of card illuminated through which the light passes through? I guess this does not matter too much and I shouldn't worry about it, but I was just wondering. oops, went a bit off topic, now back to it... I saw that when the light was moved further from the subject, it appeared smaller (as we'd expect) but I had a piece of card between so the size would have changed as well as the intensity. I found that I prefered the light closer, showing a large reflection on the right of the bottle. After reviewing on the computer, I realised that I was not getting enough light at the front of the bottle - but the case where I had the lights 45 degrees to the bottle seemed to light the front well - but made the reflection at the front. Maybe I should have tried putting the label facing 45 degrees and lit that with a light on 45 degrees. Another thing I learnt was that as I changed the light intensity (by turning off/on the different lamps and pulling them further or closer from the bottle, is that the white balance changed (as it mixed with the daylight outside). Something I did not realise at first, but learnt that I must remember for next time (you can see it in the different white balances of the photographs) Combining the effect of each light which I liked, I ended up with this 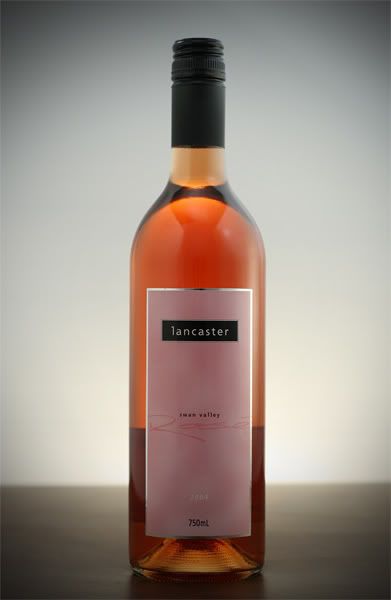
(I added the vignetting in photoshop and still have that unpleasant reflection at the bottle neck, which I might have been able to remove if I was able to cover the top. Another interesting learning exercise which gives me a lot to think about (thanks for the suggestions Gary), I will have another go with other objects soon. ---
Equipment: camera body, wide lens, standard lens, telephoto lens, flash Wish list: skill
Adam,
Great stuff; this is exactly how you learn. Are you keeping notes with the images, so that you can refer to them later on? Instead of using cardboard as your diffuser, try perhaps a white sheet, or maybe some greaseproof paper. I'm thinking cardboard might be not transluscent enough. Always be mindful of the heat the lights generate, and watch whatever you're using as your diffusers and reflectors. To answer a couple of questions, yes, your light sources' sizes will be governed by the diffusers' sizes, and yes, your expectations in terms of light falloff as you increase the light to subject distance are correct too. Background: you have a plain background, but also the table which is supporting the bottle. Consider placing some sort of plain sheeting under the bottle, and curving it up and back from the bottle. Cardboard would work for this, and it should be a somewhat gentle curve, but it should also totally obscure the table, thus giving you a completely seamless, plain background. This will remove the refraction of the table that appears in these images (a bit below the mid-point on the label, but seen theough the bottle). I suspect that the dark section in the neck may be a further refraction of your tabletop, and changing the background to remove the table from view would confirm that. Were you shooting on a tripod? The images are not quite level. Not a major point, as that was not the goal of the exercise, but something to pay attention to nonetheless. With the background as I've described above, try a pair of diffused lights, one to each side, and just a little bit in front of the bottle. What you're doing here - in just this exercise - would also benefit from the use of a light tent, and there's a description on the site somewhere (someone will no doubt have the link handy) of a home made tent and how to build it. I'm hoping that Chris will post his thoughts into the thread given that you've shot wine bottles: he does exactrly this sort of shooting, and then consumes the contents. getting back to the point, I think you're doing well, and your experimenting and learning from this exercise. Great stuff: keep it up, and please also keep on posting what you're doing, as well as your assessment of what you're doing. g.
Gary Stark Nikon, Canon, Bronica .... stuff The people who want English to be the official language of the United States are uncomfortable with their leaders being fluent in it - US Pres. Bartlet
Thanks Gary,
I see the refraction causing the line across the bottle, I will try the curved card and see how that goes - Will a piece of white A3 paper do? I'll try it. (because I can't think of any thin card in my house at the moment), then I can also try the diffused lights to the side and to the front. About taking notes, that's a good idea - currently my only notes for me to remember what I did was in the file naming, noting the position of the lights. I did things in an order I could remember (well, I thought I could remember), then when I loaded it to the computer, got a bit confused over which was which, so apart from trying to assume based on the reflection, I went back to my setup and placed the lights to see which one it matched. I will remember to write down the settings used for each image next time. (apart from lighting, I also learn things like this, to write things down! reminds me of going to a lecture and forgetting to bring a pen) I was using a tripod, and but also noticed the non-perfect alignment. I was using a manfrotto 322RC2 head, which is a pistol grip head, fast to use, but for alignment (and small changes), it's difficult. I would grip it and move it to a position, then upon releasing it -taking my hand off, it would move slightly, but enough to make the horizon slanted. (That's why I had to straigten my final image). I used to use the remote switch RS-60E3 with my 300D, but the 30D uses a different switch, so I need to buy this - so once I set up, the camera doesn't need to move - but I take it off every now and then to do the metering. After all those excuses I made, I will try to put more effort into the straightness of the photographs I searched up and saw light-tents being used, but I don't think I should 'invest' in one yet, or maybe I should... I usually photograph landscapes and would like to do more people-photography - are there light tents large enough to put people inside? Thanks for answering my questions and all the tips! ---
Equipment: camera body, wide lens, standard lens, telephoto lens, flash Wish list: skill
Nice exercise and worthwhile example of working with light and not needing to invest in studio lighting up front.
I trust that Chris is NOT using such hot lighting on his wine !!!!! Thinking he should hold a workshop at his place before he toasts too many bottles. Photography is not a crime, but perhaps my abuse of artistic license is?
I read on the strobist group someone suggesting shooting in an esky (I suppose similar to shooting in a bathtub as learnt from here, but without the water!). I decided to have a go.

Unfortunately my esky wasn't big enough so you could see shadows on the esky walls. This method seems ok, however it feels quite limited - I can only position the lights from certain directions (limited by the opening of the esky), but it was interesting. Then I taped pieces of A3 paper together to form that seamless background as you were suggesting (my taping wasn't perfect and you might be able to spot it in the picture). I took the first shot under the room lights, but it already looked alright! but it needed light in some areas, so I placed one to the left, then the right looked dark, so I placed another on the right, and one above on the left (each time after I took a photo, I placed a light to build on what the previous image was lacking). Resulting in: 
I think I'm sort of getting the hang of it, but need more critque/suggestions as to which areas I should improve on. Thanks a lot! ---
Equipment: camera body, wide lens, standard lens, telephoto lens, flash Wish list: skill
excellent...wow
check my website>> http://www.6701.sunpixs.com
Hi Adam,
Thed main thing is that you're experimenting, and learning. The esky might be ok for smaller items ... jewellery and the like. Also, consider the big, transluscent storage bins that you see at the $2 shops. For under $20 you should be able to get a fairly big one, and being transluscent, it will also act as a diffuser. Cut a hole in one end to stick your camera through (use it inverted) and set up a seamless base/background to fit within its confines, and you have a portable tabletop studio. Let's talk about this image ... My concern in this one is the big, harsh shadow underneath this one. The harshness tells me the light source was not diffused (or not very greatly diffused) and that is perhaps why you were seeing so many other shadow areas that you then needed to fill. Let's try two different concepts here ... first of all, I'd like you to return to the wine bottle for a moment, so that we can address the remaining issues that were outstanding there. Start with the setup you had for the final image you presented, but shoot that using your seamless background. I'd like to see what differences that makes. For the second concept, let's stick with the camra and lens. While I think a better photo would require the hood to be removed from the lens, for the purposes of this exercise I think it should be left on for some images, as it adds a different dimension to the images, as you may soon see, Now, we want to start with three light sources for the image of the camera. The first of these will be above and behind the (subject) camera, but pointing slightly behind the camera, towards the seamless background. The other two light sources will be situated in front of the (subject) camera, but each off to about 45 degrees above the subject, one to your left, the other to your right. Probably each at an angle of between 25 - 45 degrees from your shooting angle. Again, we're looking for maximum diffusion of the light sources, so the greater the distance between the light and the subject, the better. To a point. What we're looking to do though is to soften, as much as practicable, the light sources your using. I'm thinking in terms of (ever mindful of the heat issue) perhaps making some sort of simple frame with white fabric atteched, that you can fit to the front of the light? Or perhaps get a couple more storage containers - medium size - and find some way of mounting those to the front of your lights. We really need to convert these lights from a direct light source into something more softbox-like, because I think we need to deal with just the quality of the light and how it's affecting your images. Over to you. g.
Gary Stark Nikon, Canon, Bronica .... stuff The people who want English to be the official language of the United States are uncomfortable with their leaders being fluent in it - US Pres. Bartlet
If you're interested in more product shots, Strobist has a page on how to build your own light tent on the (very, very) cheap. I made one myself when I needed to take some product shots for work and found it extremely useful. Will eliminate those unwanted reflections and give you the seamless background Gary is talking about.
Cheers,
macka a.k.a. Kris
Thanks Gary and Kris for the suggestions.
I will give the storage box a go, and maybe also the build it yourself lighttent. You are right about the large harsh shadow underneath the subject. I only had a piece of paper over the left and right lights leaving the light at the top down at the subject. Resulting in shadows which I then needed to fill - so by doing this, perhaps I was causing more problems (shadows) that I then attempted to minimise using the other lights (which weren't as powerful). I will revisit the wine bottle, using the seamless background and my previous lighting setup and see the difference it makes. I'll probably have to stick the background on something else first, because it's currently taped to the esky and I can't get a light behind it I'm a bit unsure of the placement of the first light source. Above and behind the subject, pointing slightly behind the camera, toward the seamless background. So, between the subject and the background, from above, pointing down behind the subject - to light the background behind the subject? Ok! Soften and diffuse, I will try to create/use diffusion tools Thanks again for your input, suggestions and tips. I really appreciate it. ---
Equipment: camera body, wide lens, standard lens, telephoto lens, flash Wish list: skill
Exactly. g.
Gary Stark Nikon, Canon, Bronica .... stuff The people who want English to be the official language of the United States are uncomfortable with their leaders being fluent in it - US Pres. Bartlet
I only had time to try it again with the bottle today - using the curved paper background.
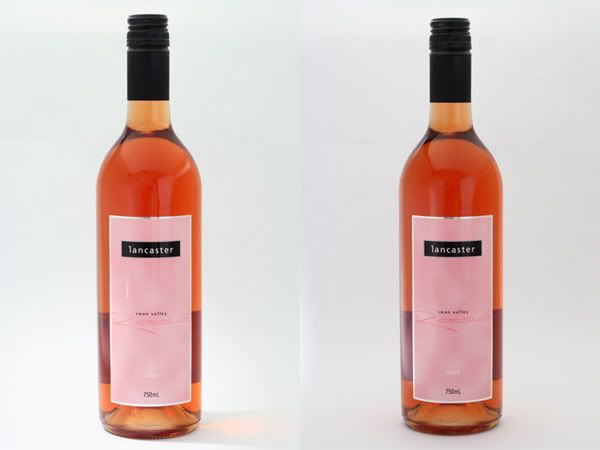
I put three lights, one approx. 45 degrees to the left and one approx 45 degrees to the right, diffused by paper. You can see the reflection of the paper just to the left and the right of the centre. The third light was positioned from above, between the bottle and the backpaper, diffused by a card (you can see the reflection of this at the bottom of the bottle neck) The light on the left was facing the paper on the left from a slightly different angle (I think that is why I've got a bit of a shadow on the right side floor) The curved paper background makes a large difference to the photograph, however, I still have the dark band of colour in the lower half of the bottle. I still don't know what it is.. I'll go check.. I just came back from checking the bottle... Now I realise what the dark band is... it's the back label!!!! I feel this is enough for tonight... tired now. and think that it might look better if reflection of the lit paper is more symmetrical. As in the first time I did it, I set up a white card on either side of the table to minimise the reflection of the room. I'll have another go tomorrow. ---
Equipment: camera body, wide lens, standard lens, telephoto lens, flash Wish list: skill
In the later shots with the wine bottle are you still using the same Bunnings style light?
Cheers Rod
I tried to set it up as similarly as possible, but no, these shots were with the lights at 45 degrees, I also took shots of it trying the same setup, I'll post it later when I get home
---
Equipment: camera body, wide lens, standard lens, telephoto lens, flash Wish list: skill
Previous topic • Next topic
18 posts
• Page 1 of 1
|


