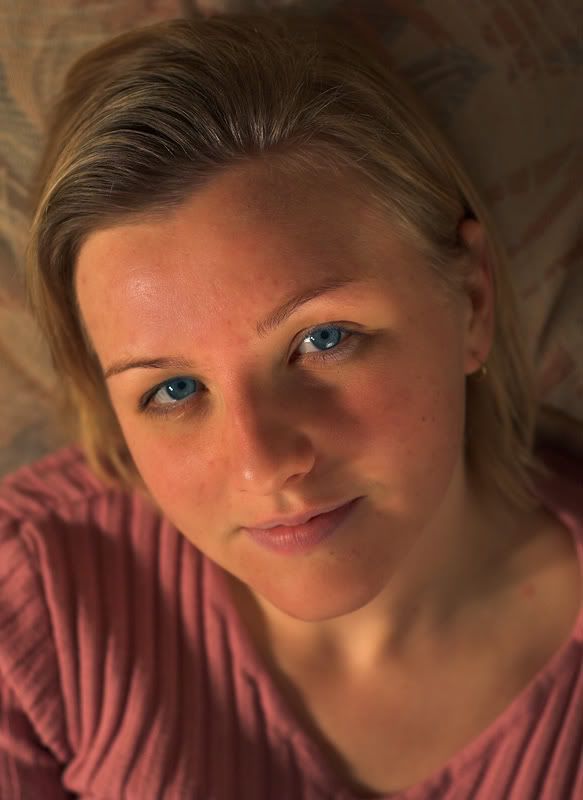
I went for a bit of a 'warm' feel to the image, so it has a warm white balance but this was deliberate.
Comments and critique welcome, I'm very new to this kind of photography.
Regards,
Owen.

A discussion forum - and more - for users of Digital Single Lens Reflex cameras.
Portrait of my wifeModerators: Greg B, Nnnnsic, Geoff, Glen, gstark, Moderators
Forum rules
Please note that image critiquing is a matter of give and take: if you post images for critique, and you then expect to receive criticism, then it is also reasonable, fair and appropriate that, in return, you post your critique of the images of other members here as a matter of courtesy. So please do offer your critique of the images of others; your opinion is important, and will help everyone here enjoy their visit to far greater extent. Also please note that, unless you state something to the contrary, other members might attempt to repost your image with their own post processing applied. We see this as an acceptable form of critique, but should you prefer that others not modify your work, this is perfectly ok, and you should state this, either within your post, or within your signature. Images posted here should conform with the general forum guidelines. Image sizes should not exceed 950 pixels along the largest side (height or width) and typically no more than four images per post or thread. Please also ensure that you have a meaningful location included in your profile. Please refer to the FAQ for details of what "meaningful" is.
Previous topic • Next topic
38 posts
• Page 1 of 1
Portrait of my wife
Here's a portrait using my cheap lighting set up. I got bunny to hold the reflector to try and lighten the shadows on the right of her nose... I think I need a bit of a stronger light there though.
I went for a bit of a 'warm' feel to the image, so it has a warm white balance but this was deliberate. Comments and critique welcome, I'm very new to this kind of photography. Regards, Owen.
Great job Owen, I hope you and Bunny are both happy with the results. Looks like you DYI studio lighting worked a treat, her left eye seems a lot sharper then her right, is this due to the DOF you used ? Either way, it worked really well.
That's a lovely shot. I agree that the shadow on her nose is a bit harsh, but really, it's a wonderful portrait that shows character very well. Hope to see some more of this style of photography from you, you're off to a great start
So join in the chorus, and sing it one and all!
Thanks for the comments gentlemen. Lisa (Bunny) likes the result although she didn't say so but gave me permission to post it hehe.
Her left eye is a bit sharper than her right, just due to the depth of field unfortunately. Next shoot I'll try to get that part right. Again, thanks for the comments, anything anyone can add to help me get better with this setup will be very much appreciated. Regards, Owen.
Thanks very much for the comment rooboy. I'll work on getting rid of the shadow in the next shoot. Cheers, Owen.
Hi Owen
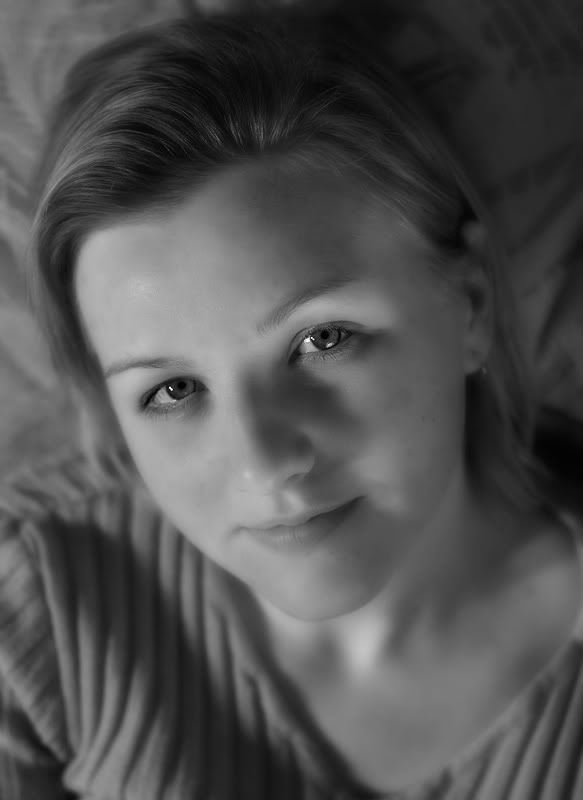
Do you use Photoshop? If so then try this with the image of your beautiful wife...er...beautiful image of your wife. Go to curves and click the middle eyedropper. Click the eyedropper on the white of her right eye. This will normalise the colour balance. I'm not sure if you will think it looks better but the original image is very warm. I apologise if the colour balance as it stands is something you have intentionally created. Regards
Matt. K
Owen great portrait and you have captured your wifes engaging eyes well. As a whole, to me, the colour seems a bit orange but nothing which cant be corrected in PP. I also could be wrong.
Nice treatment on the eyes Owen. Its nice to have a willing model. My GF is always reluctant.
Steve (Nikon D200/D700)
My photography website http://wwphoto.redbubble.com/ My photo blog http://www.redbubble.com/people/wwphoto Please feel free to offer any constructive criticism on my works
Thanks for the advice guys. Matt I tried what you suggested and it does look much better... in fact the original is far too yellow after changing it. Here's the result.
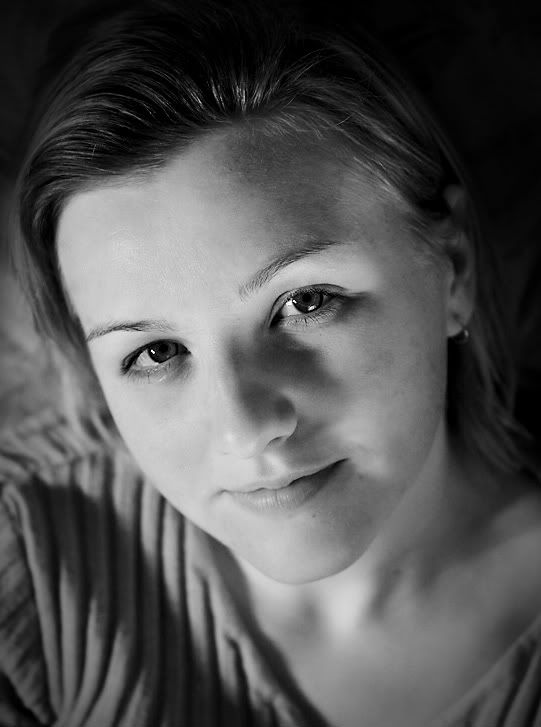
edit: this is the version that I am happy with, a little bit of warmth to it, but not overdone like above. Thanks! Last edited by owen on Tue Jun 06, 2006 10:14 pm, edited 1 time in total.
For me,
I'd bring her forward from the background so you can increase the DOF and still keep the background blurry. At present it almost looks like her face is popping out from her neck. I like to see the blurriness more graduated. There's a hot spot on the tip of her nose which could be easily fixed. I like the catchlights and the soft shadows. Maybe I'll try this sort of photo someday.
Hmmm very interesting. I too followed matt's suggestion and came up with this......a very different result. Nice tip either way Matt! Thanks. Although I do like the B&W.

Boooo 666 Last edited by ghost on Tue Jun 06, 2006 11:11 pm, edited 1 time in total.
Banned due to dishonesty and disrespect
owen, I going to go against the grain and say that your 2nd image is the best. It just looks natural and the colours are great. Keep her eyes blue
Either way a great portrait, very beautiful...
Owen, I liked different aspects of each version, so I decided to try and combine them and came up with this. What do you think?
 __________
Phillip **Nikon D7000**
Very nice phillipb!!
I love your version. Sorry all, but I had to do a test on the original in an attempt to work out why my earlier post (under Matt's instruction) was so much different to Owen's posted under the same instruction? 
Hmm now I've seen it I am lost Banned due to dishonesty and disrespect
Excellent phillip it reminds me of the painted photos of my dad and his brothers as kids... some great alternate treatments shown here.. beaut stuff.
phillipb..........can you give us a brief description on how you achieved your image?
Very, very good work. And congrats to Owen on a special photo. ghost Banned due to dishonesty and disrespect
..:: http://www.flickr.com/photos/nicknav ::..
..:: http://vortsekz.info ::.. ..:: http://vorty.deviantart.com ::.. D70, 50/1.8, 18-70/3.5-4.5, TLZ2, 1GB Ultra II CF
Well, basically I made a new copy layer, converted it to B&W diffused it a bit. On the original layer I saturated the blue eyes, blended the two layers with about 70% opacity and used the history brush to make the eyes sharp again. I also did some burning of the right hand side shadows and some dodging of the nose shadow, but I think I may have mucked that up a bit. And finally adjust the levels a bit. Oh yes, I almost forgot, I started off with the second version. __________
Phillip **Nikon D7000**
Thanks I'll roughly try to explain it, it's a rather lengthy process! But basically, convert to lab, delete b channel, delete Alpha 2, Convert to grayscale and then to RGB, duplicate layer, adjust brightness/contrast, erase any parts that have been blown from the duplicated layer with an opacity of around 50%, flatten the image, colour balance- midtone levels: 10,0,-5 roughly and then USM ..:: http://www.flickr.com/photos/nicknav ::..
..:: http://vortsekz.info ::.. ..:: http://vorty.deviantart.com ::.. D70, 50/1.8, 18-70/3.5-4.5, TLZ2, 1GB Ultra II CF
Great shots, some really good CS work in here,, I had a play with this photo in Auto FX mystic tint and tone, came up pretty nice to ,
Suzanne Nikon D200, 24-120mm VR, 70-300 ED, SB800 flash, Manfrotto tripod,
Awesome PP guys. Some really good and useful info. I'll certainly be visiting this thread again when I go to PP my next batch.
In regards to the second image and changing the midpoint as Matt mentioned, I duplicated the layer then changed the midpoint on the top layer, however this was a bit cold so I just reduced the opacity to bring some warmth from the bottom image back into it. Thanks for all the suggestions and all of the edits, there are some very good versions.
Hi Owen,
Beautiful shot of your better half. Here's an edit I spent a little bit of time on... 
cheers http://www.markcrossphotography.com - A camera, glass, and some light.
No problems... Here's an overview of what I did... you'll have to adjust each step according to what you want.... I did this in about 10mins, but I'd suggest taking your time and spending longer so that you get a better outcome.
1. Healing Brush. Zoom in on image and using the healing brush remove any blemishes. 2. Duplicate Layer. 3. On background layer, apply a gausian blur radius 2.0 pixels 4. On duplicated image, use an eraser with Opacity of 10% and start erasing around the eys and lips, forehead and cheeks. Don't go overboard as you will end up with an image that looks far too soft. 5. Flatten image. 6. Using pen tool, select one of the eyes, make selection and copy to new layer. 7. In new layer select paintbrush, opacity 11%. Use eye dropper and select part of the blue colour. change colour to slightly lighter and then carefully paint over the blue in the eyes to make them stand out a little. Apply sharpening (smart sharpen) with amount of 24%, radius 1.0, and remove gaussian blur. 8. Flatten image and do the same for the other eye. 9. Using pen tool, select the lips, make a selection, and copy to another layer. Increase red hue slightly and apply smart sharpen as per above. Using an eraser of 6%, erase slightly around the edges of her lips. Flatten image. 10. Using the lasso tool, draw around the 'red' areas on her forehead, down between the eyes, and around the cheeks and nose. copy to another layer. in hue/saturation, reduce the saturation slightly in the red channel. Flatten layers. 11. In levels, pull the right hand side of the histogram slightly to the left to increase some light, and move the right hand side slightly to the right to maintain contrast. 12. To finish off, select the healing brush again with the same settings and work your way around the eyebrows, and around the mouth. That's pretty much it... just adjust each step to what you want the outcome to be. cheers http://www.markcrossphotography.com - A camera, glass, and some light.
Previous topic • Next topic
38 posts
• Page 1 of 1
|


