Page 1 of 1

Photoshop Tips Telstra Dome

PostPosted: Tue Jun 27, 2006 9:45 pm
by Oz_Beachside
Hello,

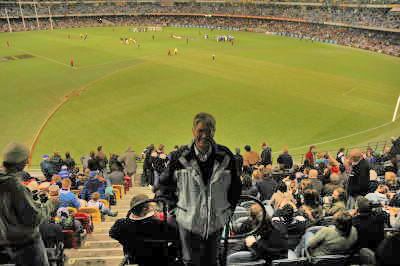
Wondering if there are any Photoshop buffs in here who can give me some basic tips on how to spilt this image into two layers, so I can change the levels, and contrast/brightness of the foreground, in an effort to bring out the details of the subject?

THanks, and regards,
Oz

Image

PostPosted: Tue Jun 27, 2006 10:17 pm
by admajic
Basically u need to select all the green, as that would be easier. So grab the top of the image, work your way down to the tops of the heads. Use magic wand tool. Good luck!

PostPosted: Tue Jun 27, 2006 10:20 pm
by phillipb
You mean like this?

Image

Just create a duplicate layer, adjust levels to your liking for the foreground, use the eraser to rub out the oval, flatten the image and you're done.

ps. Don't expect too much from the shadow areas, they may get a bit noisy.

PostPosted: Tue Jun 27, 2006 10:21 pm
by NikonUser
You could use shadow/highlight in PhotoshopCS2

Quick and nasty try:
Image

PostPosted: Tue Jun 27, 2006 10:30 pm
by Oz_Beachside
THanks for the quick feedback, I appreciate it.

I have tried the selection, and duplicate layer, and I can get the clarity. Where I failed, was at the green meets the crowd, trying to select using the magic wand. Are there more "automated" ways that changing the tolerence, and clicking each color section until all is selected?
thanks
Oz.

PostPosted: Tue Jun 27, 2006 10:33 pm
by admajic
Heres my take.
Just Invert the mask u made. Just played with levels

Image

PostPosted: Tue Jun 27, 2006 10:35 pm
by admajic
Oz_Beachside wrote:THanks for the quick feedback, I appreciate it.

I have tried the selection, and duplicate layer, and I can get the clarity. Where I failed, was at the green meets the crowd, trying to select using the magic wand. Are there more "automated" ways that changing the tolerence, and clicking each color section until all is selected?
thanks
Oz.


Its not magic. Play with the tolerance number and also Anti-alias. Look up the quick mask that can help the tricky bits.

PostPosted: Wed Jun 28, 2006 8:29 pm
by Oz_Beachside
thanks for the tips, you have saved me hours in my PP work, in general!!!

PostPosted: Wed Jun 28, 2006 9:09 pm
by xerubus
Image

simply made a level from the chap in the front of the shot... adjusted the level a bit... adjusted the background level to suit.

quick and dirty job.. but you could salvage the shot a bit with some time. only downside is that it becomes a little noisy in the shadow areas.

cheers

PostPosted: Thu Jun 29, 2006 10:45 pm
by Sir Tristram
Never ceases to amaze me what brilliant stuff can be acheived with the right tool in the right hands. Well done with the Photo Shopping.

PostPosted: Thu Jun 29, 2006 11:34 pm
by Oz_Beachside
THANKS SOOO MUCH!!!

I will have a try with this on the weekend. I am sooo please, as the two pics I got were in a hurry, and exposure was terrible. Now I can send my friend the pic, as he has already gone back to Holland.

Testament to the benefits and priviledges received in this group/forum.

Heart felt appreciation :D

Cheers
Oz

PostPosted: Thu Jun 29, 2006 11:46 pm
by ozczecho
xerubus wrote:Image

simply made a level from the chap in the front of the shot... adjusted the level a bit... adjusted the background level to suit.

quick and dirty job.. but you could salvage the shot a bit with some time. only downside is that it becomes a little noisy in the shadow areas.

cheers


xerubus, thats an amazing result. WOW.

Can I ask what you mean by "made a level from the chap in the front of the shot"? How do you make a level from just that person?

TIA

Mike

PostPosted: Thu Jun 29, 2006 11:52 pm
by Oz_Beachside
xerubus, what method of selection did you use? If I use the magic wand, with varying tolerence, I still get harsh joins between the two selections. Is there a better method for selection, and a faster method?

PostPosted: Fri Jun 30, 2006 7:28 am
by xerubus
ozczecho and oz_beachside... i use the pen tool when doing work like this. it's not difficult.. just take your time.

if there is a definite edge between the subject and the background, you can use the extract tool with good effects.

if i'm wanting a good job i use the following technique... bookmark it.. it's a great tutorial:

http://av.adobe.com/russellbrown/ExtractSM.mov


cheers

PostPosted: Sat Jul 01, 2006 10:29 pm
by Oz_Beachside
xerubus, thanks for the tute. Its great.

A first pass quick try (my focus was the extracting, not the colors).

A wonderful new lesson, thanks again!

Let me know what you think of my first try using the pen tool, brushed over, then use as a path, then using extract, based on path.

BEFORE...
Image

AFTER 20 minutes...
Image